Monday, 17 October 2011

FREE DIGI STAMPS

Christmas Bauble
NOT ONE BUT TWO FREE DIGI-STAMPS just for you..... 

At last as promised your FREE Digi-Stamps for Christmas. Use them to embellish your Christmas Cards or Scrapbook pages,  make a Frame using the Holly leaves or use them on their own to embellish other crafts such as bags of sweets etc.,  


Iv'e used the Holly image with Metallic Markers on black cardstock - don't forget the little highlight on the berries. You could also add red Adhesive Gems for the berries and if you don't have any red gems in your craft stash, colour plain gems with a red Permanent Marker.
* Note: To copy the Digi-images, double click the image then right click your mouse and "Copy"
Then paste into your Graphics programme ie. "Paint" and print.
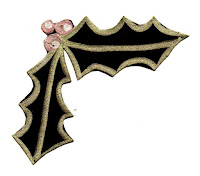
How your FREE Digi Stamp could look coloured
with Metallic Markers.
 

NEWS - "WOW EMBOSSING POWDERS DESIGN TEAM.


I'm now Designing/Demonstrating for "WOW" Embossing Powders as well as DoCrafts so have my work cut out up to the NEC Show. Look out for some of  my creations on the "WOW" Stand at the NEC Birmingham in November. 


Tuesday, 11 October 2011

Demo at Ottery Nurseries Wednesday Oct. 12th from 12 - 6pm

I'm Demonstrating Card Making and the new DVD/CD's using the Digital Designer programme at Otter Nurseries tomorrow.  I love the Digi-Designer programme as you can access a wonderful range of images, papers, bows, tags, embellishments - the list goes on and on.  You can also import your own images into your cards and create different looks with colour and shadows etc.,
Santa's at the Door Card

Come along to the demo at Otter Nurseries and take a peek at the lovely new products plus see what the new Digi Designer programme could do for you. Download a Voucher from the DoCrafts website for money off your DVD/CD before you come in and you could get up to £25.00 off. Hope to see you there.

Friday, 7 October 2011

STEPPER CARD TUTORIAL

At my Demonstrations I am always being asked how to make a Stepper Card as people find them difficult to make. Hope you find the instructions easy to follow. Here goes:

1. Take a C6 Card and cut off a small slither off the opening side so that the card measures exactly 4" wide. (See cross-hatched area on the picture) This will help when measuring your score lines for the steps.    


2. Open the card with the inside facing you. Measure 1. 1/2" in from the long edge and draw a line - this will give you the side part of the card that stands up without the steps.

Now for your score lines.  On the left half of the card measure in 2" and score from the line you have just drawn to the edge of the card.(See diagram - dotted lines)  This will in effect create the large step at the back of the card.


3.  On the right hand side of the opened card - from the bottom edge, score 3/4" in from the bottom and again another 3/4" from the line you have drawn out to the edge so you have two equal score lines  This will give you the small step when folded. 

4. Next, measure in from the last score line you made another 1.1/4" and score another line. This will give you the middle step when folded. See diagram for measurements and how it should look.
Now cut from the first score line, (along the solid line),  down to the last score line - See small crosses on the diagram.

5.  Now for your folds. Hold the card up as normal and fold down what was the centre of the card leaving the side part upright.  Crease your 2" score line into a Mountain fold giving you the back step.

6.  Concertina the rest of the score lines to create the middle step and small step in the front of the card.


Hey Presto - All Done.  Top Tip: Cover your card with paper before you cut and score. It's much easier than doing it afterwards.
I hope this helps all the ladies and gents who have requested the instructions. Let me know if you have any queries by leaving a comment and I will do my best to assist. Thanks.


Thursday, 6 October 2011

Christmas Decoration

A hug THANKS to Tracey at Homefayre in Tiverton for this idea. I used the Big Shot to cut out 6 Four Petal Die Shapes to form a frame, folded them in half and joined each one together. The smaller petal die cuts were also folded in half and stuck together to form a decoration that fit in the middle of the larger one. I fastened them all together with beads and wire.
Hope you like it....

Wednesday, 5 October 2011

Demo's Buy and Save, Wellington -Jewellery and Monkton Elm Garden Centre, Launceston - Card Making

Hi All
I will be demonstrating jewellery at Buy and Save in Wellington on Saturday 8th and Card-Making on Sunday 9th at Monkton Elm Garden Centre in Launceston.
Hope to see you all there.... AND....

Due to popular demand, I will be adding Step by Step instructions  for an "easy to make" Stepper Card on here in the very near future -I'm constantly getting requests to show people how to make these cards and have found that every other set of instructions Iv'e read quite complicated, so, perhaps I can make it a bit easier for everyone.
It will be on here in the next few days....