Keep a look out in January for my feature in the January issue of Creativity Magazine.
Iv'e made some cards using the new DoCrafts January/February Goody Bag... Lots of lovely new products for you to stroke and get crafting with.
Hope to see you at my next Demo at The Range on January 7th where I will be demonstrating how to make the cards from the magazine and also lots of new and exciting crafts.
ENJOY YOUR CHRISTMAS AND NEW YEAR...
Friday, 16 December 2011
Wednesday, 30 November 2011
FREE DIGI-STAMP - Flower
Your FREE Digi-Stamp is here for Nov/Dec - Apologies for being a bit late with this one but life's been hectic and what with Christmas coming etc., etc, etc.,
 Anyway, hope you like it and can use it for lots of things. Add it to your cards as an embellishment or increase the size and make it the main feature.
My new stamp designs sets will be coming soon... I can't wait to use them - there are trees, fences, landscape scenes, flowers and more..... They compliment the first Landscape scenes perfectly too so watch this space for the new arrivals.....
My new stamp designs sets will be coming soon... I can't wait to use them - there are trees, fences, landscape scenes, flowers and more..... They compliment the first Landscape scenes perfectly too so watch this space for the new arrivals.....
Friday, 25 November 2011
Countdown to Christmas - Fridge Magnets

Great for changing the numbers for an Advent Calendar.
Make learning fun too. This idea could be used to help teach children to spell etc.,
Make all the letters of the alphabet or make numbers and use it as an aid to maths. The possibilities are endless.
Tuesday, 15 November 2011
Recycle to Create Lovely Table Decorations
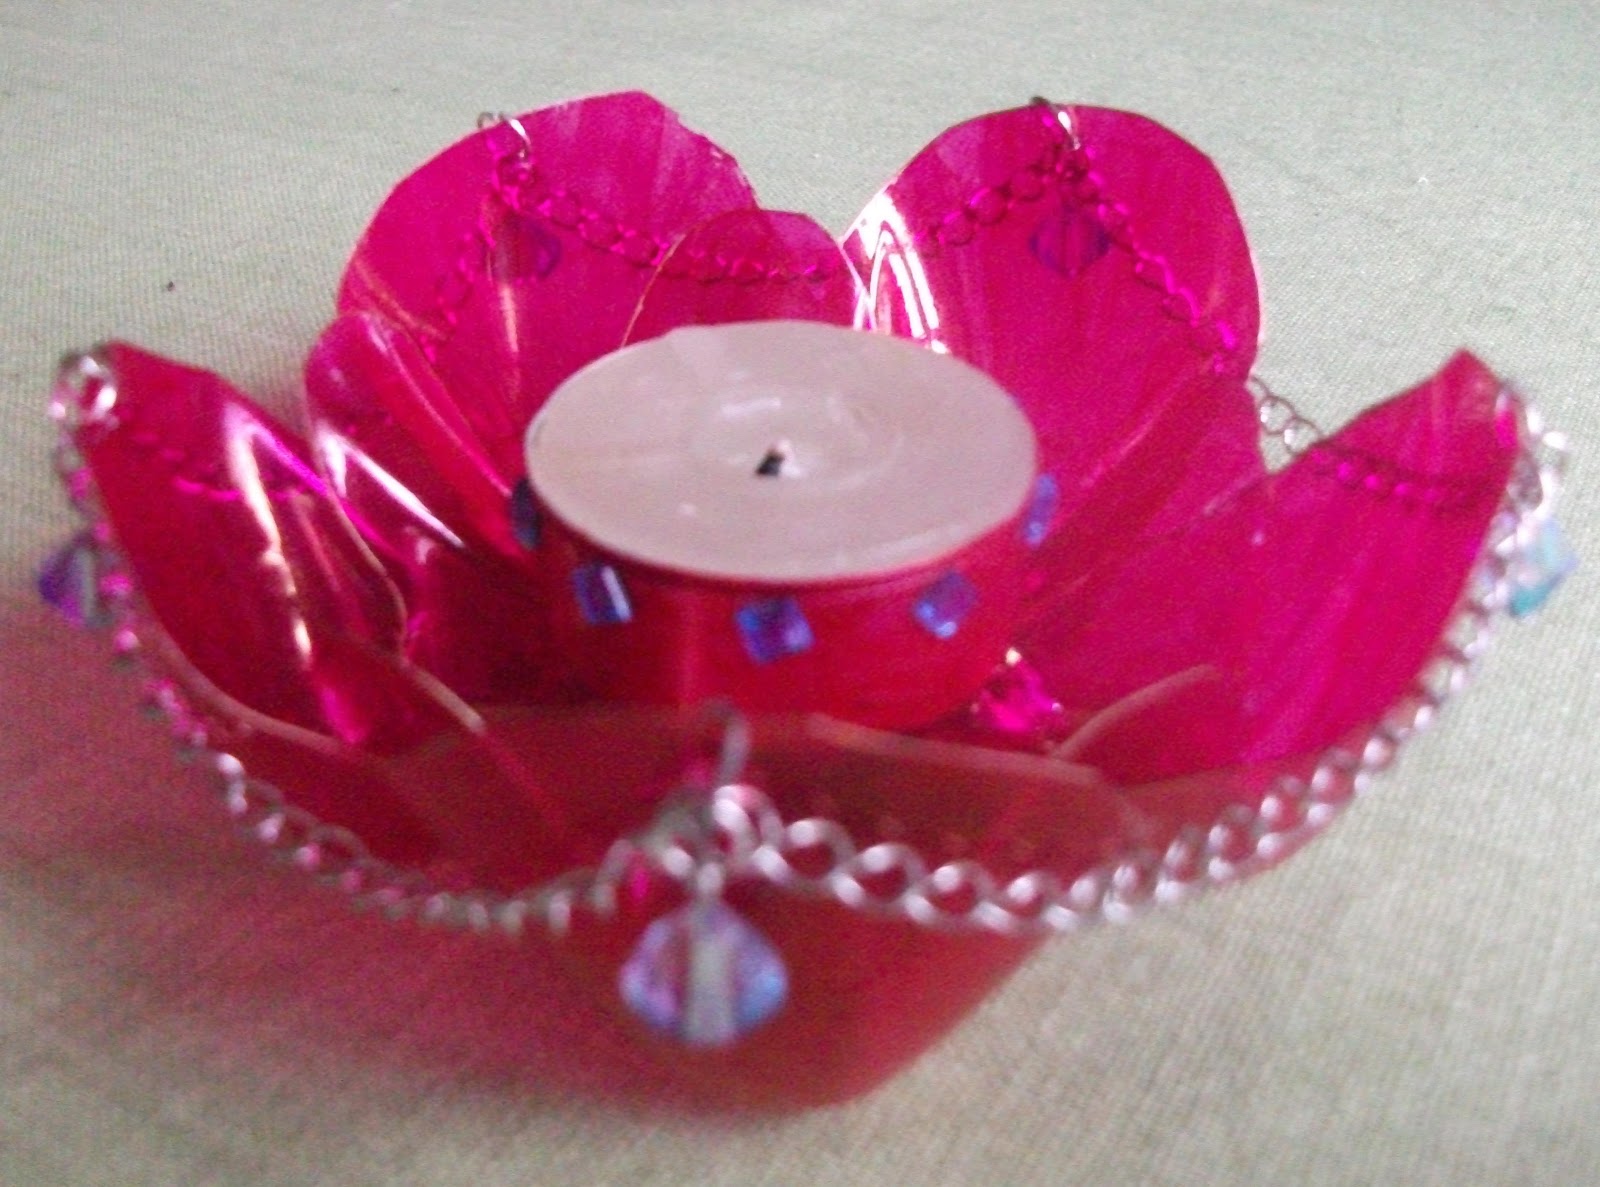 |
| Recycled Bottle Table Decoration |
This table decoration was made using a Tonic Bottle. I am well into recycling and try and find things around the house to use. Besides that, this was a good excuse to finish a Gin and Tonic as this table decoration is made with a Tonic bottle, which had to be empty of course...... I hope you like it and are inspired to create your own works of art using recycled products.
Instructions.
Cut the bottom off a lemonade and tonic bottle. You will see they are shaped so follow the shapes, rounding off the sections to form petals and you will create your two flowers, one bigger than the other (which fit inside one another to create a flower).
Colour the plastic with permanent markers.
Piece a hole in each of the outside "petals" and add a jump ring. Add chain to this ring all around the flower.
Add a crystal bead to a head pin and form a loop which you can then attach to each of the jump rings. Hey presto you have your table decoration.
I also coloured a candle T-Light with permanent markers too to match the colour of the candle-holder.
Thursday, 10 November 2011
Follow my Blog for your Free Digi-Stamp
Watch this space for your new Free Digi-Stamp coming soon to my blog.
Your new Digi-stamp will soon be on my blog for you to copy and use to your heart's content.
Keep looking back here so you don't miss out......
Your new Digi-stamp will soon be on my blog for you to copy and use to your heart's content.
Keep looking back here so you don't miss out......
Tiverton Demo -Saturday Nov 12th 10.00am-4.00pm
 Look out you lovely ladies in Tiverton. I am on my way and can't wait to show you the new range of Urban Stamps from DoCrafts. I love them. There will be new ideas for Christmas as well as everyday themes. Hope to see you there - for a taster of what's to come see the Card on the right.
 Iv'e used some printed cardstock, ink pads and Urban stamps to create this card. The words are made up from a Happy Birthday Glitterations Sticker which Iv'e adapted to read Miss You and Hurry Home.
Looking forward to Saturday's Demo....
Monday, 17 October 2011
FREE DIGI STAMPS
 |
| Christmas Bauble |
NOT ONE BUT TWO FREE DIGI-STAMPS just for you.....
At last as promised your FREE Digi-Stamps for Christmas. Use them to embellish your Christmas Cards or Scrapbook pages, make a Frame using the Holly leaves or use them on their own to embellish other crafts such as bags of sweets etc.,
Iv'e used the Holly image with Metallic Markers on black cardstock - don't forget the little highlight on the berries. You could also add red Adhesive Gems for the berries and if you don't have any red gems in your craft stash, colour plain gems with a red Permanent Marker.
* Note: To copy the Digi-images, double click the image then right click your mouse and "Copy"
Then paste into your Graphics programme ie. "Paint" and print.
* Note: To copy the Digi-images, double click the image then right click your mouse and "Copy"
Then paste into your Graphics programme ie. "Paint" and print.
 |
How your FREE Digi Stamp could look coloured with Metallic Markers. |
 |
NEWS - "WOW EMBOSSING POWDERS DESIGN TEAM. |
I'm now Designing/Demonstrating for "WOW" Embossing Powders as well as DoCrafts so have my work cut out up to the NEC Show. Look out for some of my creations on the "WOW" Stand at the NEC Birmingham in November.
Tuesday, 11 October 2011
Demo at Ottery Nurseries Wednesday Oct. 12th from 12 - 6pm
I'm Demonstrating Card Making and the new DVD/CD's using the Digital Designer programme at Otter Nurseries tomorrow. I love the Digi-Designer programme as you can access a wonderful range of images, papers, bows, tags, embellishments - the list goes on and on. You can also import your own images into your cards and create different looks with colour and shadows etc.,
Come along to the demo at Otter Nurseries and take a peek at the lovely new products plus see what the new Digi Designer programme could do for you. Download a Voucher from the DoCrafts website for money off your DVD/CD before you come in and you could get up to £25.00 off. Hope to see you there.
 |
| Santa's at the Door Card |
Friday, 7 October 2011
STEPPER CARD TUTORIAL
At my Demonstrations I am always being asked how to make a Stepper Card as people find them difficult to make. Hope you find the instructions easy to follow. Here goes:
 1. Take a C6 Card and cut off a small slither off the opening side so that the card measures exactly 4" wide. (See cross-hatched area on the picture) This will help when measuring your score lines for the steps.
Now for your score lines. On the left half of the card measure in 2" and score from the line you have just drawn to the edge of the card.(See diagram - dotted lines) This will in effect create the large step at the back of the card.

5. Now for your folds. Hold the card up as normal and fold down what was the centre of the card leaving the side part upright. Crease your 2" score line into a Mountain fold giving you the back step.
 6. Concertina the rest of the score lines to create the middle step and small step in the front of the card.

2. Open the card with the inside facing you. Measure 1. 1/2" in from the long edge and draw a line - this will give you the side part of the card that stands up without the steps.

3. On the right hand side of the opened card - from the bottom edge, score 3/4" in from the bottom and again another 3/4" from the line you have drawn out to the edge so you have two equal score lines This will give you the small step when folded.
4. Next, measure in from the last score line you made another 1.1/4" and score another line. This will give you the middle step when folded. See diagram for measurements and how it should look.
Now cut from the first score line, (along the solid line), down to the last score line - See small crosses on the diagram.
 6. Concertina the rest of the score lines to create the middle step and small step in the front of the card.
Hey Presto - All Done. Top Tip: Cover your card with paper before you cut and score. It's much easier than doing it afterwards.
I hope this helps all the ladies and gents who have requested the instructions. Let me know if you have any queries by leaving a comment and I will do my best to assist. Thanks.
Thursday, 6 October 2011
Christmas Decoration
 A hug THANKS to Tracey at Homefayre in Tiverton for this idea. I used the Big Shot to cut out 6 Four Petal Die Shapes to form a frame, folded them in half and joined each one together. The smaller petal die cuts were also folded in half and stuck together to form a decoration that fit in the middle of the larger one. I fastened them all together with beads and wire.
Wednesday, 5 October 2011
Demo's Buy and Save, Wellington -Jewellery and Monkton Elm Garden Centre, Launceston - Card Making
Hi All
I will be demonstrating jewellery at Buy and Save in Wellington on Saturday 8th and Card-Making on Sunday 9th at Monkton Elm Garden Centre in Launceston.
Hope to see you all there.... AND....
Due to popular demand, I will be adding Step by Step instructions for an "easy to make" Stepper Card on here in the very near future -I'm constantly getting requests to show people how to make these cards and have found that every other set of instructions Iv'e read quite complicated, so, perhaps I can make it a bit easier for everyone.
It will be on here in the next few days....
Wednesday, 21 September 2011
Enchanted Christmas at The Range, Exeter -Saturday 24th Sept
Hi all,
I look forward to seeing you there.
 |
| Enchanted Christmas Card |
My next demo is at The Range in Exeter on Saturday. They have the Enchanted Christmas range of products in store as well as all the new "Me To You - Winter Wonderland" and "Christmas Time" range of goodies.
I'll be making lots of different things, including crackers, decorations, cards, ATC's, boxes and more....I look forward to seeing you there.
Monday, 12 September 2011
MORE FRIENDLY PLASTIC with WOW EMBOSSING POWDERS - UNDER THE SEA
This picture was created with Friendly Plastic and WOW Embossing Powders using my own Hand-made Silk Papers which I have been making for some time now.

 I used real silk fibres to create the backing papers and incorporated other fibres for effect. Iv'e embossed the papers too with WOW Embossing Powders to add glitter and sparkle. I made a mould from a real fossil, added air drying clay and let this go hard, painted it then I could incorporate this home-made fossil into the work.
I also embossed a real shell with WOW Pearlised Embossing Powders and incorporated both the fossil and shell into Friendly Plastic, which I also added WOW powders to.
Both embellishments were then added to the picture. I love mixed media as it gives you an excuse to use up everything exciting in your craft kit.

 I used real silk fibres to create the backing papers and incorporated other fibres for effect. Iv'e embossed the papers too with WOW Embossing Powders to add glitter and sparkle. I made a mould from a real fossil, added air drying clay and let this go hard, painted it then I could incorporate this home-made fossil into the work.
 I also embossed a real shell with WOW Pearlised Embossing Powders and incorporated both the fossil and shell into Friendly Plastic, which I also added WOW powders to.
Both embellishments were then added to the picture. I love mixed media as it gives you an excuse to use up everything exciting in your craft kit.
FRIENDLY PLASTIC JEWELLERY
 |
| Friendly Plastic Necklace and Earrings. |
I stamped into the F.Plastic with a DoCrafts V & A stamp which had a very small intricate pattern on it. The colour of the plastic changed and became much more irridescent.
Nice surprise as now I can't wait to see what my other strips of plastic look like now once I stamp into them.
Nice surprise as now I can't wait to see what my other strips of plastic look like now once I stamp into them.
Friday, 26 August 2011
FREE Digi-Stamp on it's way.
Hi all
Your September FREE Digi-Stamp will soon be on my blog. Watch this space......Iv'e designed the stamp so that you can use it on it's own or incorporate it with other stamps to create scenes. I love it and hope you do too.
My DoCrafts Kit arrived yesterday - Lots of lovely new products to show you and new techniques to come too in my forthcoming demo's.
My next Demo will be at Buy and Save in Wellington on September 10th. Hope to see you there.
Thursday, 11 August 2011
Demo at Endsleigh Garden Centre, near Plymouth on Sunday 14th
 |
| Stepper Card |
My two demo's went really well last weekend and thanks to all the people that turned up. Hope you were inspired to go and make lots of unique creations yourselves. I left lots of samples in the shop as usual so that you can have a reminder of what I made on the day.
I'm at Endsleigh Garden Centre near Plymouth on Sunday - lots to show you with all the lovely products. There will be Christmas cards as well as Birthday and Everyday cards and crafts.
See you there.
Friday, 5 August 2011
Demo's this weekend
Hi all,
I have two Demo's this weekend. On Saturday I'm at Homefayre in Crewkerne and Sunday - Trago Mills in Liskeard.
 |
| Cards and boxes made with the Happy Birthday Range from DoCrafts |
I'll be designing lots of new cards with the July/August products - some Christmas (yes, sorry, we card-makers are already making Christmas Cards) and some lovely Cards in summer colours.
The Big Shot will be there too so I'll be demoing die cut cards, images, embossing and more. Hope to see you there.
Friday, 22 July 2011
FREE DIGI-STAMP - IVY FRAME
Here is your latest FREE Digi-Stamp - Ivy Frame
Print out the image (double click your mouse then print out the image) and use the Frame by stamping your design inside. Use the Frame to surround photo's or Calligraphy letters or use it as an insert for inside your cards etc. I would love to see what you make with it.
 Follow my Blog to keep up to date with the latest Demo's, Workshops and Talks etc., Create a link to my blog to get the latest freebies and Blog Candy to come in the near future....
Visit http://www.christinescraftyart.com/ for more ideas in My Gallery. See you soon with more Step by Step guides to Card Making. Enjoy using your stamp - more to come so watch this space.....
Print out the image (double click your mouse then print out the image) and use the Frame by stamping your design inside. Use the Frame to surround photo's or Calligraphy letters or use it as an insert for inside your cards etc. I would love to see what you make with it.

Visit http://www.christinescraftyart.com/ for more ideas in My Gallery. See you soon with more Step by Step guides to Card Making. Enjoy using your stamp - more to come so watch this space.....
Sunday, 17 July 2011
Christmas Decoration Step by Step

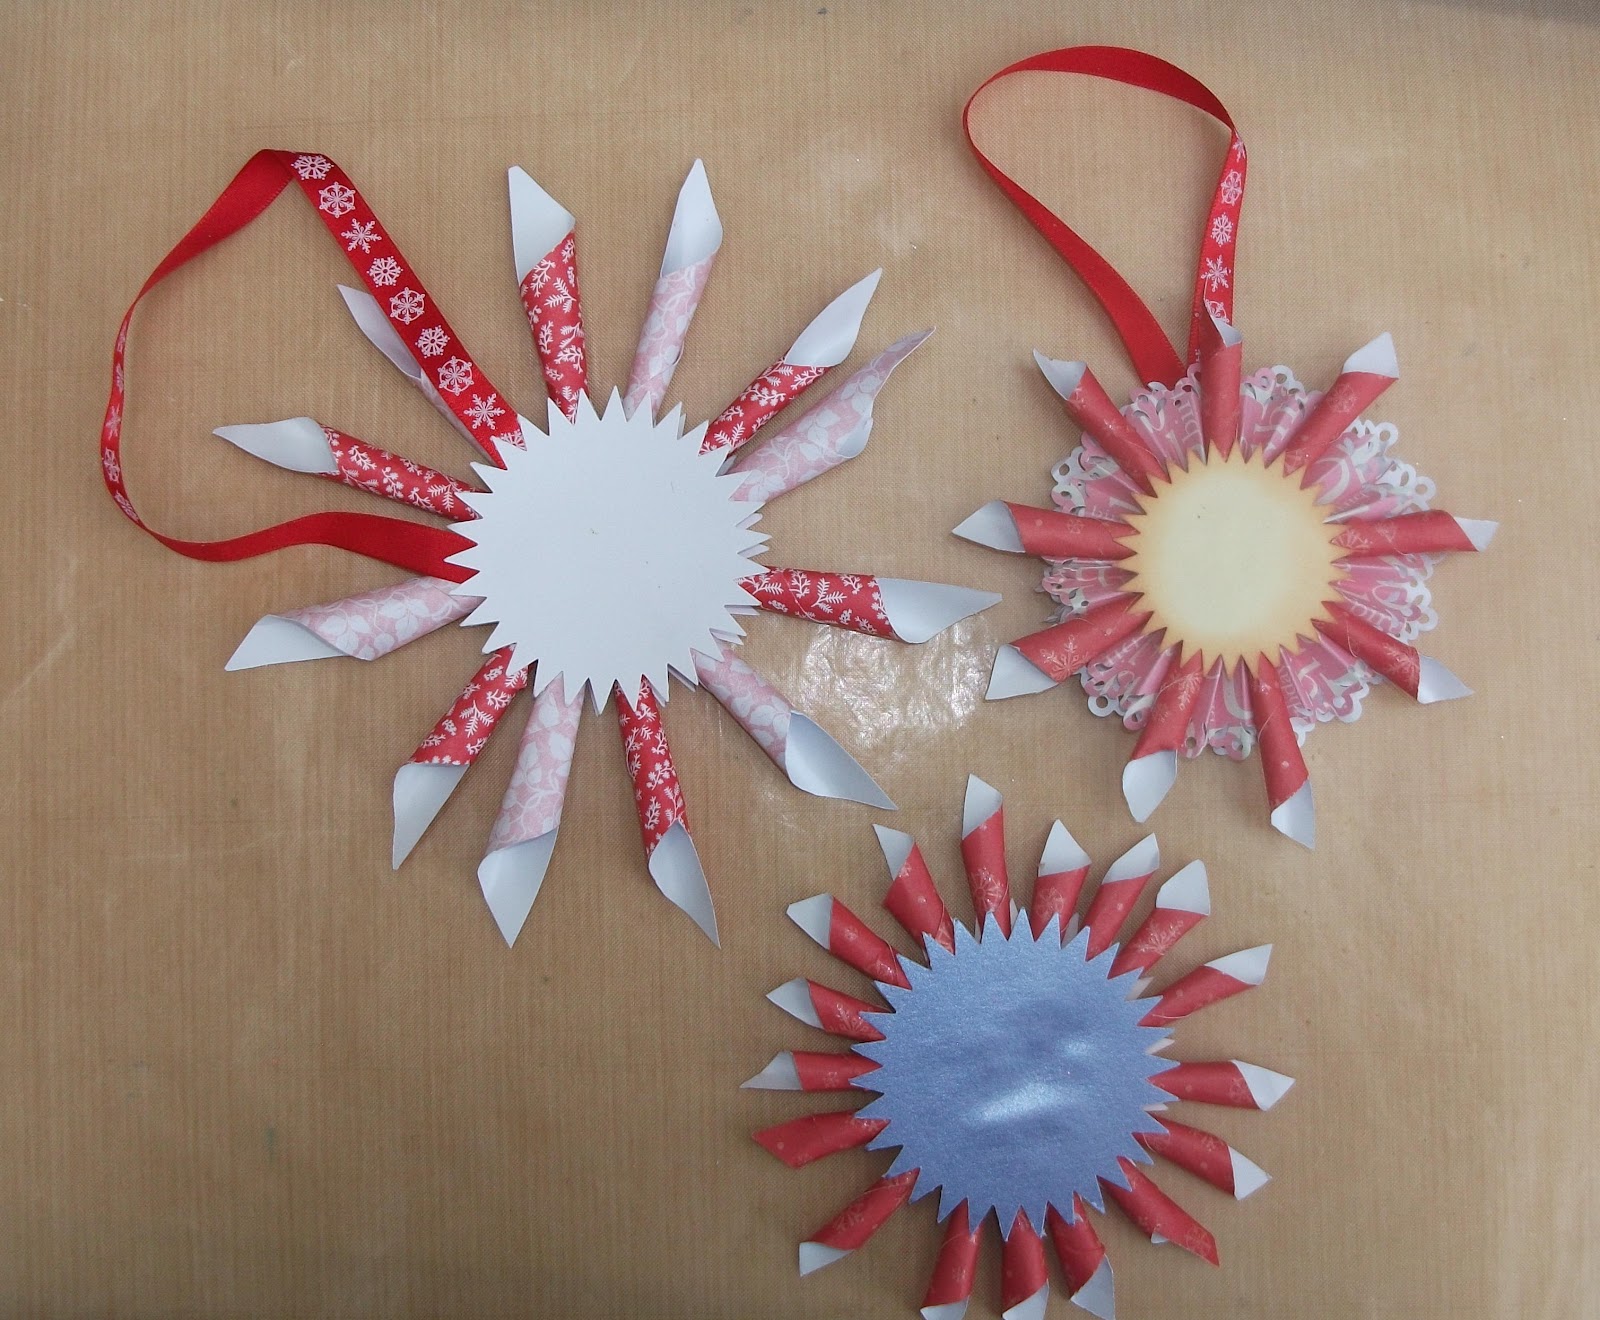
As promised the Step by Step instructions for the Christmas Decoration - You will need 12No. pieces of 2" x 3" paper - 6 of one colour and 6 of another plus two circles. (I used two die cut flower circles using the new Dies from XCut).
Cut all of the pieces into a point as shown in the picture.
Start your cut approx 1" up from the bottom and cut to point (top centre).

Roll each piece around a pencil then glue with Anita's Tacky Glue.

Lift each piece off the pencil before the glue is dry and twist to form a
cone shape. Your cone should be smaller at the bottom than the top.

Stick all these cones to one of the circles using Tacky Glue then turn the whole thing over and add ribbon for the handle.

Stick the other circle onto the cones and leave to dry.
Please "Follow" and Visit my Blog regularly for more to come including Blog Candy Competitions. Thanks.
Website at http://www.christinescraftyart.com/.
Monday, 11 July 2011
Demo's at Scrapstore in Yeovil and Otter Nurseries.
Thanks to all that attended the Demo at the Community Resource Centre in Yeovil on Saturday and the DoCrafts Demo at Ottery Nurseries on Sunday.
I hope you all enjoyed the Demo's and will go away full of ideas to make your own creations.
I will be back at the Community Resource Centre in Yeovil in October with lots of new and exciting creations with "unusual" crafting goodies.
Also, at Ottery Nurseries, I will be back on August 3rd from 1pm - 7pm with new creations for you to see as well as some old favourites.
As promised, I will put the instructions for the Christmas decoration on here in the next few days - step by step - so that you can all make one for yourselves. It was the most popular item on display so I'm quite happy to share it with you all along with some more ideas on what you could use the techniques for.
Watch this space for more to come very soon......
I hope you all enjoyed the Demo's and will go away full of ideas to make your own creations.
I will be back at the Community Resource Centre in Yeovil in October with lots of new and exciting creations with "unusual" crafting goodies.
 |
| Christmas Hanging Decoration |
As promised, I will put the instructions for the Christmas decoration on here in the next few days - step by step - so that you can all make one for yourselves. It was the most popular item on display so I'm quite happy to share it with you all along with some more ideas on what you could use the techniques for.
Watch this space for more to come very soon......
Monday, 27 June 2011
Another Beach Scene using my own Stamp Designs
 |
| Beach Scene using my Own Stamp Designs |
Iv'e been busy designing more Landscape Scenic stamps - his one I particularly like as it's simple but gives the impression of depth (aerial perspective).
Iv'e designed lots of new images which are ready to be made into Stamps and Digi-images too.Keep a look out for new cards etc on this blog. The sky and foreground for this card were created using dye inks and a soft brush. The shells, driftwood and background landscapes were coloured with Pro-markers and Zig Alcohol pens.
Saturday, 18 June 2011
Beach Scene using my own Designs.
I've made a few more cards using my Build a Landscape Stamps and Digi-Stamps - This card is a scene using only 4 Stamps.
I coloured the background with inks using blue for the sky and sand colour for the dunes. I kept the background landscape stamps in a soft blue colour to create an aerial perspective look and stamped the grasses in the forground in deep brown. This brings the grasses to the foreground making you look into the picture. I also went round the card with ink to create a darker edge, again leading your eye into the picture.
 |
| Beach Scene using 4 Stamps |
I coloured the background with inks using blue for the sky and sand colour for the dunes. I kept the background landscape stamps in a soft blue colour to create an aerial perspective look and stamped the grasses in the forground in deep brown. This brings the grasses to the foreground making you look into the picture. I also went round the card with ink to create a darker edge, again leading your eye into the picture.
 |
| Tree Landscape on Watercolour paper. |
For this next scene I have used Watercolour Paper 140lb Not Pressed. I painted the background with blue paint and used a soft tissue to take off some of the colour whilst the paint was still wet. This created the cloud effect that you can see here. For the tree stamp I used a brown ink pad. I also used the grass stamp in the foreground to create depth after painting the foreground using the paint on a dry brush. The whole scene was then mounted onto brown cardstock to finish.
Designs by Nikki Smith

Digi - Stamp.
Nikki, a very talented lady used her design skills to come up with this lovely card. It's good to see how other Designers use my Stamps as we all have different ideas and unusual ways of putting the stamp images together to create something new. Thanks Nikki.
Friday, 3 June 2011
One of my new Digi-Stamp Frames made into a Card
 |
| Landscape Scene with Digi-Stamp |
The card itself was coloured with inks, spritzed onto a Glass mat and watered down. I then added mica ink and placed the cardstock on top to soak in the colours.
The image itself is coloured with Zig Markers and Pro Markers. Hope you like it.
For more Digi-Stamp images go to my website at http://www.christinescraftyart.com/
More to come in the very near future so watch this space.
Thursday, 2 June 2011
NEW - DIGI-STAMPS NOW ON MY WEBSITE
 At last, my first batch of Digi-Stamps are now on my website and ready to purchase. The first Designs to go onto the site are Digi-Stamps of Corner Frames with Flowers and Ivy Leaves which can be used on Cards or Scrapbook pages.
 Get creative and see what you can come up with. I would love to see your Designs so put them on your Blogs or send them to me via my website http://www.christinescraftyart.com/ (email addy on the last page)
I love framing pictures with flowers so watch this space for some Cards that I have made using the images themselves. There will be more to come in future so watch this space for even more new Designs - I now need to get busy making Cards for my next few Demo's for DoCrafts but also can't wait to start Designing even more Digi -Stamps. I'm planning a Christmas theme perhaps? Sorry to mention Christmas in June but us Card-Makers prepare early.
I hope you like the images....
Wednesday, 1 June 2011
FREE DIGI- STAMP JUST FOR YOU
Hi again
COMING SOON on my website at http://www.christinescraftyart.com/ - New Digi-Stamps - a new range of Frames and Corner Borders will soon be available on my website BUT - just for you Iv'e decided to give a FREE Digi-Stamp each month for my Blog readers.

The first of these images is a Corner Ivy Image which you can colour in or just leave black and white to add to your Cards and Scrapbook pages.
Print the image off onto the cardstock that you intend to use. Next month will be another image for you to use on your crafting projects.
(Right-click onto the image on the right with your mouse and press "copy" then go to your chosen programme e.g. a Word Document and Click on "paste")
I hope you enjoy using the image and watch this space for more to come in future months. Go to http://www.christinescraftyart.com/ for more ideas on crafting and new images for you to use.
HAPPY CRAFTING
Demo at Homefayre in Crewkerne

My Demo for DoCrafts this week is at Homefayre in Crewkerne on Saturday 4th June. I'll be playing with the Artiste Acrylic Paints again to create all different kinds of backgrounds for your Toppers or Decoupage and also using inks, pens and foils etc.,
I hope to see you there for new ideas, designs and more............ using the DoCrafts range of products.
The shop have crafty bargains galore so come along and don't miss out. Hope to see you there.
Tuesday, 17 May 2011
NEW DEMO'S AND WORKSHOPS NOW AVAILABLE

My next Demo for DoCrafts will be at The Range on Saturday 21st May from 10.00 - 4.00pm and I'm at Homefayre in Crewkerne on 4th June so hope to see you there. I'll be demonstrating all the latest DoCrafts products including Tatty Teddy - Me to You papers etc.,
I'm also holding a Demonstration at the Community Resource Centre in Yeovil on Saturday 9th July where you can see me Demo a variety of products in-store. I'll be covering lots of crafting techniques both new and old so if you fancy a free demo then come along to watch between 10.00 and 4.00 pm. You can also "have a go" yourself with some of the techniques.
I love the Resource Centre as you can find some real crafting bargains both from their regular store and also the recycling centre where I often pick up cardstock and papers to add to my crafting stash. You never know what you may find to craft with.... so come along and grad a bargain.
I love the Resource Centre as you can find some real crafting bargains both from their regular store and also the recycling centre where I often pick up cardstock and papers to add to my crafting stash. You never know what you may find to craft with.... so come along and grad a bargain.
Check out my new WORKSHOPS to be held at Yandles in Martock, Somerset in Beginners' Painting, Silk Fibre Craft and Card-Making - using my own range of "Build a Landscape" Stamps. The Stamps can be purchased at http://www.christinescraftyart.com/. Places are available now but going fast so get booked in as soon as possible to avoid disappointment.
Tuesday, 3 May 2011
New Demonstrations.

My Demonstrations this weekend are on Saturday 7th at Buy and Save in Wellington and on Sunday 8th at Trago Mills in Liskeard, Cornwall.
I will be demonstrating with the new "Tatty Teddy" Range from Me To You and the "Tulip" Range which is lovely and very feminine.
Both ranges offer papers, stickers, ribbons, glitter stickers and more and are adaptable as they mix and match too.
I look forward to meeting my "ladies and gents" again and new faces too. The demo's will cater for all abilities and tastes so hopefully everyone can leave with something to go home and try out plus lots of lovely products to play with.
Monday, 4 April 2011
Demonstrations coming up

Hi all,
I'm off to Launceston to Homeleigh Garden Centre on Friday 8th April for a Card Making Demonstration. I'm also at Endsleith Garden Centre on Sunday 17th April too.
I'll be demoing lots of new ideas using the Midnight Fairy, Pampered Pets and Country Companions sets of papers, stamps, stickers, ribbons etc.,
Iv'e also been painting lots of flowers with Anita's Acrylic Paints and adding them onto my cards.
Easy techniques that you may be able to see if you visit one of the demonstrations above.
Hope to see you there.
Chris
Monday, 21 March 2011
Stamps and Real Silk Fibres
Hi all
My new stamps are selling well and great news - Iv'e managed to find another supplier that will produce them a little cheaper so I'm passing this reduction onto my customers.
There is already another "Design Set" in the pipeline which will match the first set and compliment the images so keep an eye on my website for further designs.
If you are like me, you want something a bit "different" to craft with and use your creative skills in a variety of ways. In the near future, I will be selling real Silk Fibres - these can be used in a variety of ways - making your own paper, using them with hand-made felt to create all manner of items and a method Iv'e devised myself - using the Silks for decorating glass and plastic. Methods will be on my website and blog so watch this space for further details.
The Silk Fibres are easy to use and give stunning results to your crafting. Lovely colours too. More images of items Iv'e made with the fibres will be on here soon.
Chris
My new stamps are selling well and great news - Iv'e managed to find another supplier that will produce them a little cheaper so I'm passing this reduction onto my customers.
There is already another "Design Set" in the pipeline which will match the first set and compliment the images so keep an eye on my website for further designs.

If you are like me, you want something a bit "different" to craft with and use your creative skills in a variety of ways. In the near future, I will be selling real Silk Fibres - these can be used in a variety of ways - making your own paper, using them with hand-made felt to create all manner of items and a method Iv'e devised myself - using the Silks for decorating glass and plastic. Methods will be on my website and blog so watch this space for further details.
The Silk Fibres are easy to use and give stunning results to your crafting. Lovely colours too. More images of items Iv'e made with the fibres will be on here soon.
Chris
Thursday, 3 March 2011
My New Stamps are on my Website for Sale

At last my new Stamp Designs are on my website for sale. It took me ages to set up and I have had so much trouble trying to sort it out postage wise Iv'e included postage prices within the Stamp prices for UK purchasers only.
I must say I am an old fashioned girl and still prefer to receive cheques and order forms so anyone who also prefers this method of ordering and paying has that facility too. All they need to do is email me and I can send on an order form by return.
Take a look - at http://www.christinescraftyart.com/
My Demo this Saturday for DoCrafts is at Homefayre in Tiverton and on Sunday, Endsleigh Garden Centre near Plymouth where I will be demoing the new Midnight Fairy Range and Pampered Pets to name a few. Pictures going onto my DoCrafts Gallery very soon. To see them go to www.docrafts.com/CraftsRChris to access my Gallery.
Wednesday, 16 February 2011
My Stamp on Vellum this time

This time Iv'e created an image using my own Stamp Designs on Vellum. I coloured the Vellum with Pro-Markers and embossed the vellum too to give definition.
Hope you like it.
Iv'e also created an image using Metal Foil. Unfortunately this didn't photograph very well due to the shiny nature of the metal  sheet.
 sheet.
 I used Ancient Page waterproof ink and this did seem to dry quite well on the metal - enough for me to emboss on the front then again on the back to emphasise the rocks and branches.
Hope you like them.
Monday, 14 February 2011
More Cards made from my Own Stamp Range

Here are some more Cards made from my own Range of Stamps. They are available to purchase - just email me and I will send along details.
See my website soon for details too.
Hope you like the images.
There will be more to come very soon. The images are so adaptable that you can use them on their own or build scenes with them as you can see from these cards.

I have used 6 stamps for this design. All landscape scene stamps which you can mix and match according to the look that you want to achieve.

Iv'e used some shrink plastic for this card. I stamped the tree with waterproof ink pads and coloured it with pro-markers. I then stamped the tree again onto some shrink plastic and added it as an embellishment at the bottom of the card.
Wednesday, 9 February 2011
DoCrafts Demo at Homefayre Tiverton Saturday 12th Feb.

Hi all
My next demo is at Homefayre in Tiverton on Saturday 12th Feb.
It will be both Jewellery and Card-Making so hope to see you all there.
There will be lots of DoCrafts bargains in store too along with other sales items. I'll be showing you new techniques for both jewellery and cards plus a few "extra's" - you will have to wait and see. Lets just say, if you love the die cuts and embossing then watch this space....or better still come to the demo on Saturday. I'll be using Craft Planet Felt among other things to make jewellery complimenting it with different ranges of Cousins beads.
If youv'e not tried beading before then come along and start a new hobby and grab yourself a bargain to boot.
See you there -Chris
Tuesday, 8 February 2011
NEW STAMP DESIGNS AVAILABLE
My new Stamp Designs are available now: For details email christine.saunders@talktalk.net for a full list of the stamps along with all the images, costs etc.,
My website www.christinescraftyart.com will soon have all the details and images etc., so keep an eye on the site in the very near future for details of the stamps etc.,
This set has been so popular that I will have to have a re-run very soon (selling out fast) and will also produce another complimentary set for you all so that they will all mix and match and you can play to your heart's content.
Have fun all.....
CARDS MADE BY FRIENDS USING MY NEW STAMP DESIGNS.

Look what "Nikki-did-next" has done - A friend of mine, Nikki Smith has made up some cards using my new Stamp Designs. Nikki has done a fantastic job and has really adapted some of the Build a Landscape Designs in different ways to show how versatile the stamps are and how clever she is too. Nikki is a Designer with DoCrafts as well as an independent Designer in her own right.
Here are a few of the card images Nikki sent to me:


Thanks Nikki - hope to see more of your designs soon. Have fun with the stamps.
Take a look at Nikki's blog for more ideas. at www.what-nikki-did-next.blogspot.com Chris x
.
Thursday, 3 February 2011
My New Stamp Designs have arrived
My New Stamp Designs have arrived. I'm so pleased with my new
stamp designs - Iv'e made up 3 cards using various stamps from my new
range, some to build landscape scenes and the Blue Card below was made using a single stamp of mine but the sentiment is from the DoCrafts Birdsong range of stamps. Simple but effective.
The stamps are available to purchase as a full A4 sheet set
of 27 various stamps including scenes, trees, grasses, birds and more. or as singles. Please contact me via email for detials at christine.saunders@talktalk.net
The Landscape scenes are made using 5 different stamps on the Bridge Card and 2 on the Beach at Beer card. Iv'e used alcohol pens to colour the stamps. Keep a look out for more designs to come on here and on my website. http://www.christinescraftyart.com/
I hope you like the stamps. I will be using various
techniques to show you how to use the stamps for
different effects. Watch this space for
ideas and videos to come too....
Must dash now, off to play with my new toys.

stamp designs - Iv'e made up 3 cards using various stamps from my new
range, some to build landscape scenes and the Blue Card below was made using a single stamp of mine but the sentiment is from the DoCrafts Birdsong range of stamps. Simple but effective.
The stamps are available to purchase as a full A4 sheet set
of 27 various stamps including scenes, trees, grasses, birds and more. or as singles. Please contact me via email for detials at christine.saunders@talktalk.net
The Landscape scenes are made using 5 different stamps on the Bridge Card and 2 on the Beach at Beer card. Iv'e used alcohol pens to colour the stamps. Keep a look out for more designs to come on here and on my website.
 http://www.christinescraftyart.com/
I hope you like the stamps. I will be using various

techniques to show you how to use the stamps for
different effects. Watch this space for
ideas and videos to come too....
Must dash now, off to play with my new toys.
Subscribe to:
Posts (Atom)